IRIS - Integration using payform
The steps below will help you setup the Payform with IRIS in your environment.

• Step 1: Frontend Integration
<body>
  ...
  <script src="https://sandbox-js.everypay.gr/v3"></script>
</body>
<body>
  ...
  <script src="https://js.everypay.gr/v3"></script>
</body>
• Step 2: Define the payment element
Create a div element with id="pay-form".
This element is where the form will be positioned within your page.
This element is required by Everypay.js
 <body>
    <div>
      <!-- My App -->
      ...
      <div class="payment-container">
          <h1>Iris Payment</h1>
          <div id="pay-form"></div>
      </div>
      ...
    </div>
  </body>
• Step 3: Mount the form
Let's create the previously declared function in our scripts section.
Now lets call the everypay.payform() function.
The everypay.payform() function expects a payload and a response handler.
Here you can read more about the Payload that is available.
...
<script>

let payload = {
  pk: 'your-public-key',
  amount: 1000,
  locale: 'el',
  data: {
      email: "my_customer@example.com"
  },
  otherPaymentMethods: {
      iris: {
          merchantName: 'MerchantName',
          country: 'GR',
          sessionHandler: irisCallbackHandler,
      },
  },
}

// Mock iris callback handler (simulates the backend validation)
const irisCallbackHandler = async (data) => {
  try {
      // Call the Iris session validation endpoint on your server
      // This endpoint should interact with EveryPay's /iris/sessions endpoint
      // and return the session signature
      // Use your own server URL here
      // Reference to "Step 2: Create IRIS session" in documentation
      const response = await fetch('/your-iris-session-url', {
          method: "POST",
          mode: "cors",
          cache: "no-cache",
          credentials: "same-origin",
          headers: {
              "Content-Type": "application/json",
          },
          body: JSON.stringify(data),
      });

      if (!response.ok) {
          throw new Error(`HTTP error! status: ${response.status}`);
      }

      const result = await response.json();
      console.log('Session validation result:', result);

      // Return the signature for further processing
      return result.signature;
  } catch (error) {
      console.error('Iris session validation failed:', error);
      throw error;
  }
};

everypay.payform(payload);

</script>
• Step 4: Create IRIS session (Backend)
Check the code below for an implementation example of your backend.
  <?php

  header('Content-Type: application/json');

  // Get the raw POST data
  $input = file_get_contents('php://input');
  $data = json_decode($input, true);

  $sk = 'your-private-key';
  $postRequest = array(
  'amount'=> $data['amount'] ,
  'currency'=> $data['currency'],
  'country'=> $data['country'],
  'uuid'=> $data['uuid'] ?? null,
  'callback_url'=> 'https://merchant-domain.com/callback',
  'md'=> 'your-md-data' ?? null,
  );

  $cURLConnection = curl_init('https://sandbox-api.everypay.gr/iris/sessions');
  curl_setopt($cURLConnection, CURLOPT_USERPWD, "$sk:");
  curl_setopt($cURLConnection, CURLOPT_POSTFIELDS, $postRequest);
  curl_setopt($cURLConnection, CURLOPT_RETURNTRANSFER, true);

  $apiResponse = curl_exec($cURLConnection);
  curl_close($cURLConnection);

  // $apiResponse - available data from the API request to be returned to frontend
  $jsonArrayResponse = json_decode($apiResponse);
  <?php

  header('Content-Type: application/json');

  // Get the raw POST data
  $input = file_get_contents('php://input');
  $data = json_decode($input, true);

  $sk = 'your-private-key';
  $postRequest = array(
  'amount'=> $data['amount'] ,
  'currency'=> $data['currency'],
  'country'=> $data['country'],
  'uuid'=> $data['uuid'] ?? null,
  'callback_url'=> 'https://merchant-domain.com/callback',
  'md'=> 'your-md-data' ?? null,
  );

  $cURLConnection = curl_init('https://api.everypay.gr/iris/sessions');
  curl_setopt($cURLConnection, CURLOPT_USERPWD, "$sk:");
  curl_setopt($cURLConnection, CURLOPT_POSTFIELDS, $postRequest);
  curl_setopt($cURLConnection, CURLOPT_RETURNTRANSFER, true);

  $apiResponse = curl_exec($cURLConnection);
  curl_close($cURLConnection);

  // $apiResponse - available data from the API request to be returned to frontend
  $jsonArrayResponse = json_decode($apiResponse);
Typical flow:
- Receive payment details from your frontend
- Perform IRIS session request. For details on iris session creation check API specification /iris/sessions
- Return the
response.signatureto your Frontend
Example Request
curl --location 'https://sandbox-api.everypay.gr/iris/sessions' \
  --header 'Content-Type: application/x-www-form-urlencoded' \
  --header 'Authorization: Basic secret_key' \
  --data-urlencode 'amount=500' \
  --data-urlencode 'currency=EUR' \
  --data-urlencode 'country=GR' \
  --data-urlencode 'callback_url=http://merchant.com/your_callback' \
  --data-urlencode 'uuid=uuid' \
  --data-urlencode 'md=md-data'
curl --location 'https://api.everypay.gr/iris/sessions' \
  --header 'Content-Type: application/x-www-form-urlencoded' \
  --header 'Authorization: Basic secret_key' \
  --data-urlencode 'amount=500' \
  --data-urlencode 'currency=EUR' \
  --data-urlencode 'country=GR' \
  --data-urlencode 'callback_url=http://merchant.com/your_callback' \
  --data-urlencode 'uuid=uuid' \
  --data-urlencode 'md=md-data'
• Step 5: Handling Responses
Responses will be sent to your callback_url.
Successful Iris Response
curl --location --request POST 'http://merchant.com/your_callback' \
--header 'Content-Type: application/x-www-form-urlencoded' \
--data-urlencode 'token=src_xxxxxxxxxxxxxxxxxxxxxxxx' \
--data-urlencode 'md=data_sent_by_the_merchant' \
--data-urlencode 'type=iris' \
--data-urlencode 'hash=Base 64 encoded signature to verify using your secret key'
Signature Verification Example:
-
Base64 decode the
hashfield →hash1|{"callback_url":"http://merchant.com/your_callback", "token":"src_xxxxxxxxxxxxxxxxxxxxxxxx", "md":"Order 1234567", "type":"iris"} -
Generate signature using HMAC-SHA256 (Pseudo code)
Hmacsha256(‘{"callback_url":"http://merchant.com/your_callback","token":"src_xxxxxxxxxxxxxxxxxxxxxxxx","md":"Order 1234567", "type": "iris"}” }’, sk_xxxxxxxxxxxxxxxxxxxxxxxxxxxxxxx) -
Compare generated hash with received hash.
Failed request example
curl --location --request POST 'http://merchant.com/your_callback' \
 --header 'Content-Type: application/x-www-form-urlencoded' \
 --data-urlencode 'error_status=402' \
 --data-urlencode 'error_code=12345' \
 --data-urlencode 'error_message=Error message' \
 --data-urlencode 'hash=hash_that_must_be_validated' \
 --data-urlencode 'md=data_sent_by_the_merchant'
• Step 6: Create IRIS Payment
After receiving a successful response in your_callback url you have to proceed with creating the IRIS payment to the api
curl --location --request POST 'https://sandbox-api.everypay.gr/payments’ \
--header 'Content-Type: application/x-www-form-urlencoded' \
--header 'Authorization: Basic secret_key' \
--data-urlencode 'token=src_xxxxxxxxxxxxxxxxxxxxxxxx' \
--data-urlencode 'amount=amount_in_cents' \
curl --location --request POST 'https://sandbox-api.everypay.gr/payments’ \
--header 'Content-Type: application/x-www-form-urlencoded' \
--header 'Authorization: Basic secret_key' \
--data-urlencode 'token=src_xxxxxxxxxxxxxxxxxxxxxxxx' \
--data-urlencode 'amount=amount_in_cents' \
For more details regarding the payment creation please refer to the /payments endpoint in our api.
Check Step 8 for more information on how to handle the callback and webhook.
• Step 7: Register to Webhook - New Payment (IRIS) (Highly Recommended)
As IRIS payments are performed outside our platform, it is possible that the user may interrupt the redirection to your callback.
As a safety measure we highly recommend you to register to the Webhook New Payment (IRIS) in order to be notified for successful payments.
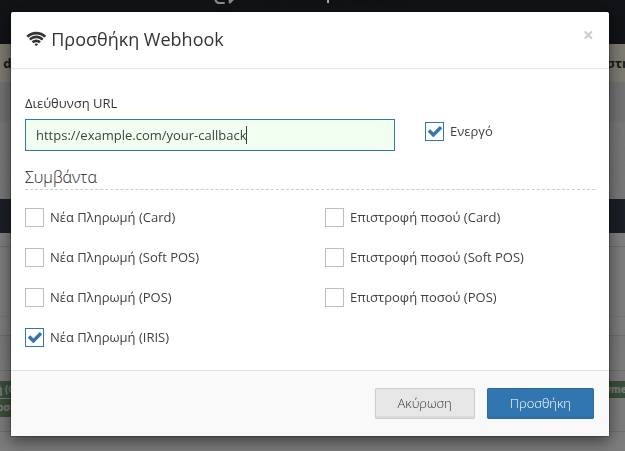
More details on how to set up a Webhook can be found in our Webhooks documentation.
Once an IRIS payment is completed, EveryPay will send a notification to your registered webhook URL with the payment details.
Successful Iris Response
{
  "token": "src_xxxxxxxxxxxxxxxx",
  "md": "merchant data",
  "hash": "..." // Base 64 encoded signature to verify using your secret key
}
Failed Iris Response
{
  "md": "merchant data",
  "hash": "...", // Base 64 encoded signature to verify using your secret key
  "error_status": 400,
  "error_code": 41001,
  "error_message": "This is an error"
}
Once Webhook is received, if the transaction is successful you need to make a POST request to /payments endpoint in our api as described in Step 6.
Check Step 8 for more information on how to handle the callback and webhook.
Alternatively, you can create a per payment webhook URL when creating the IRIS session by using the
webhook_urlparameter. This URL will be used only for this individual IRIS payment.For more details on iris session creation check API specification /iris/sessions
• Step 8: Handle Callback and Webhook
Sometimes you might not get the callback because the user may close or interrupt the payment flow.
But you will always get the webhook for successful IRIS payments.
There are three possible sequences:
- First you receive Callback and then Webhook notification
- First you receive Webhook notification and then Callback
- You only receive Webhook notification
No matter which one you receive, you can call /payments once using the token.
- The first request will succeed.
- A second request with the same token will return an error:
{
    "error": {
    "status": 400,
    "code": 41001,
    "message": "Payment source src_xxxxxxxxxxxxxxxxxxxxxxxx has already been used"
    }
}
Recommendation
Always rely on the webhook to complete your logic, because it is guaranteed for successful IRIS payments.